Vision Drone Complete Guide
This is a complete guide about building and operating the vision drone from scrach.
Frame and Hardware Assembly
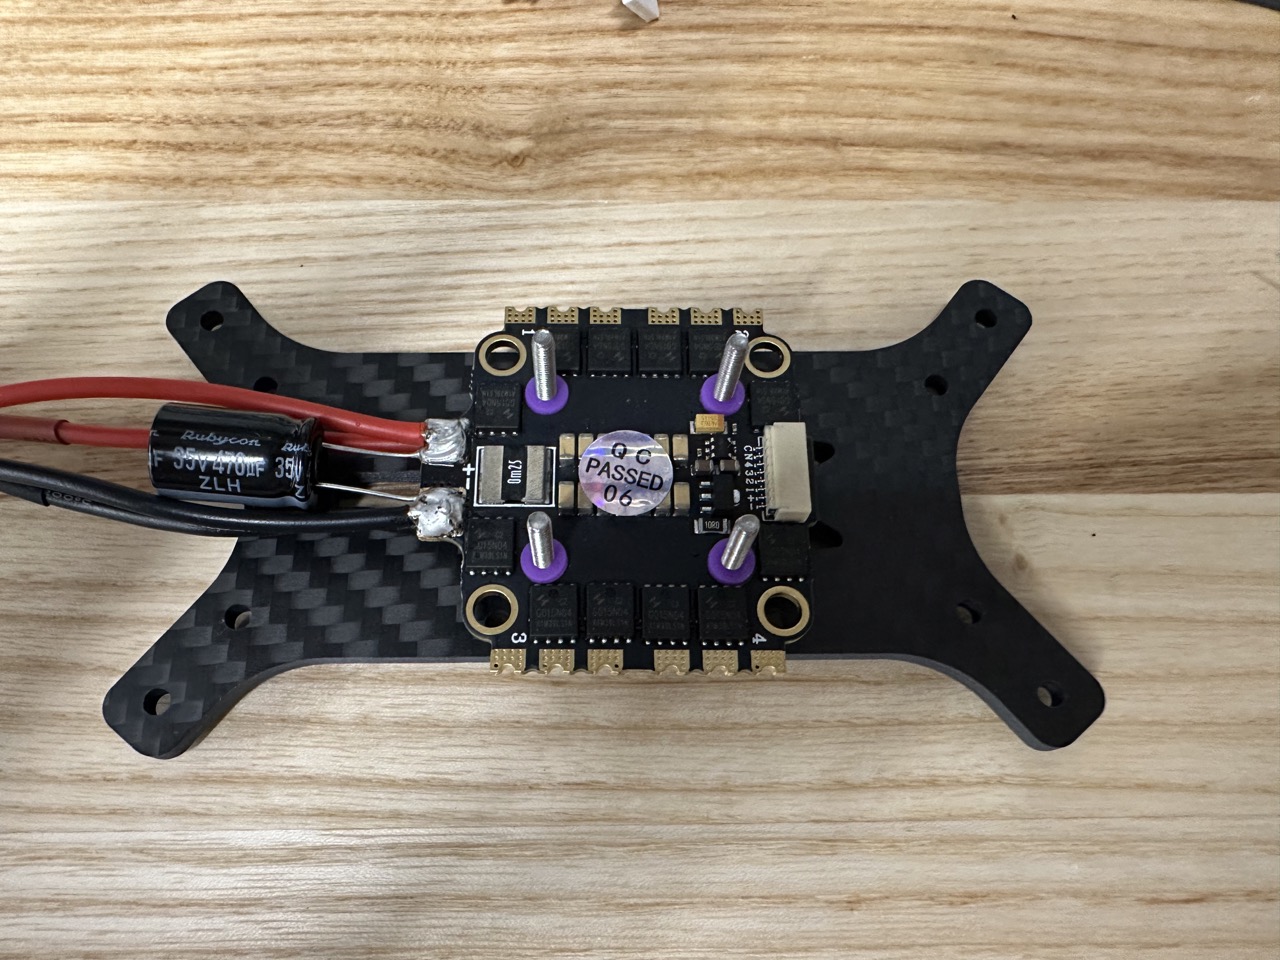
ESC Assembly
Prepare the following items:
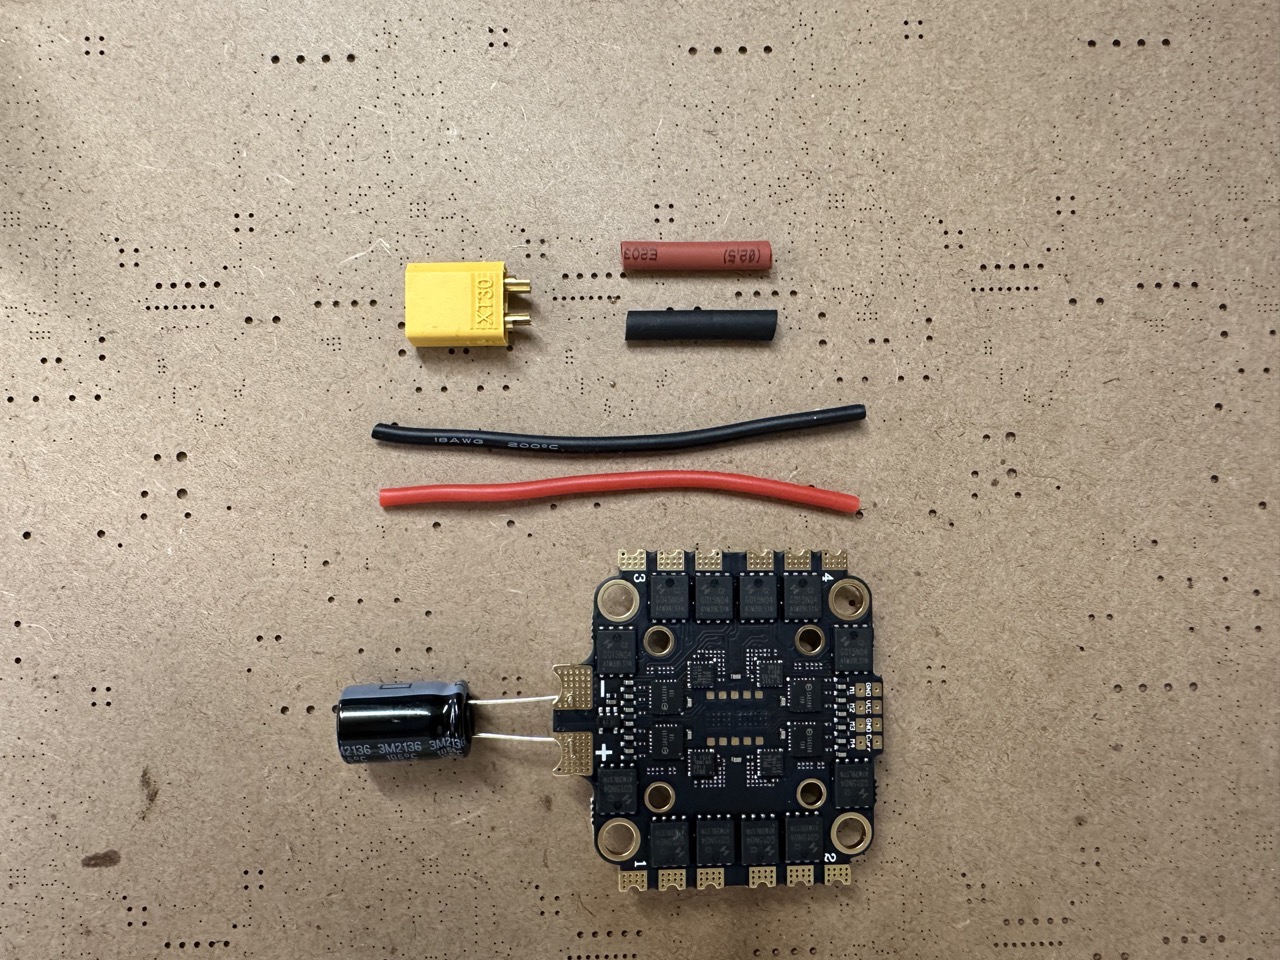
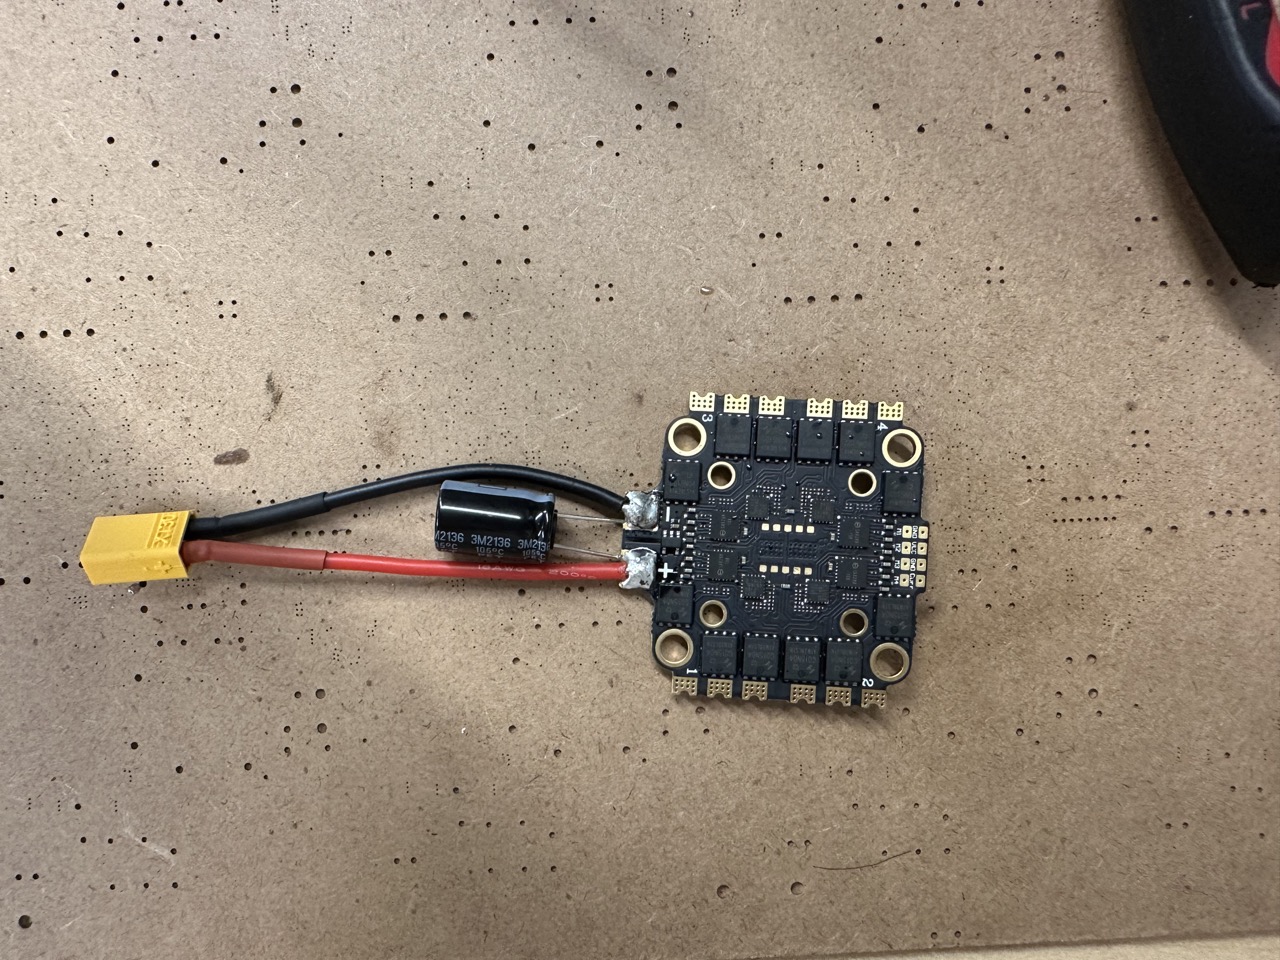
Solder the capacitor, power cable into the ESCs. Pay attention to the front and back of the ESC.
Prepare the following items:
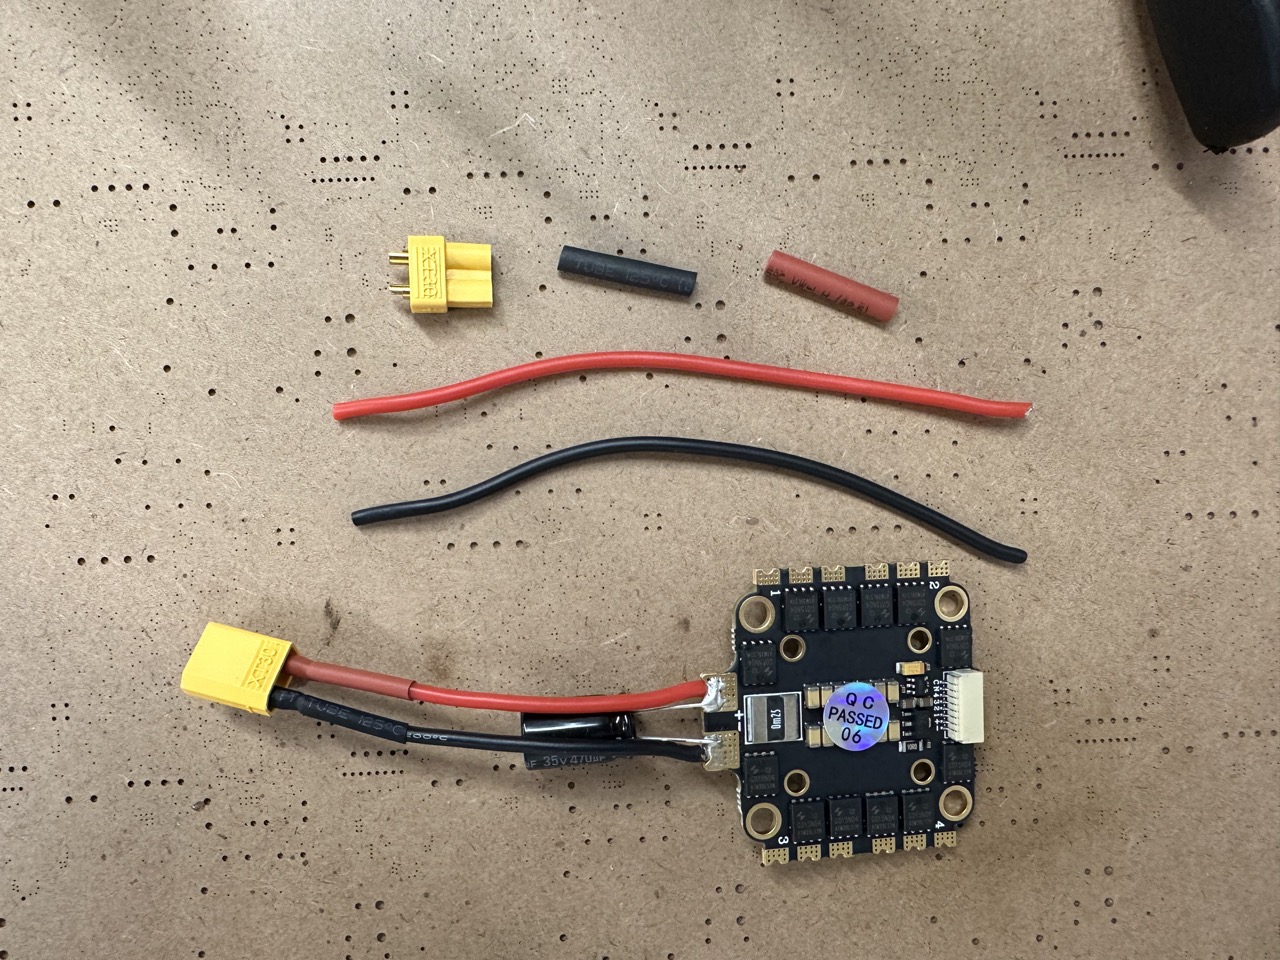
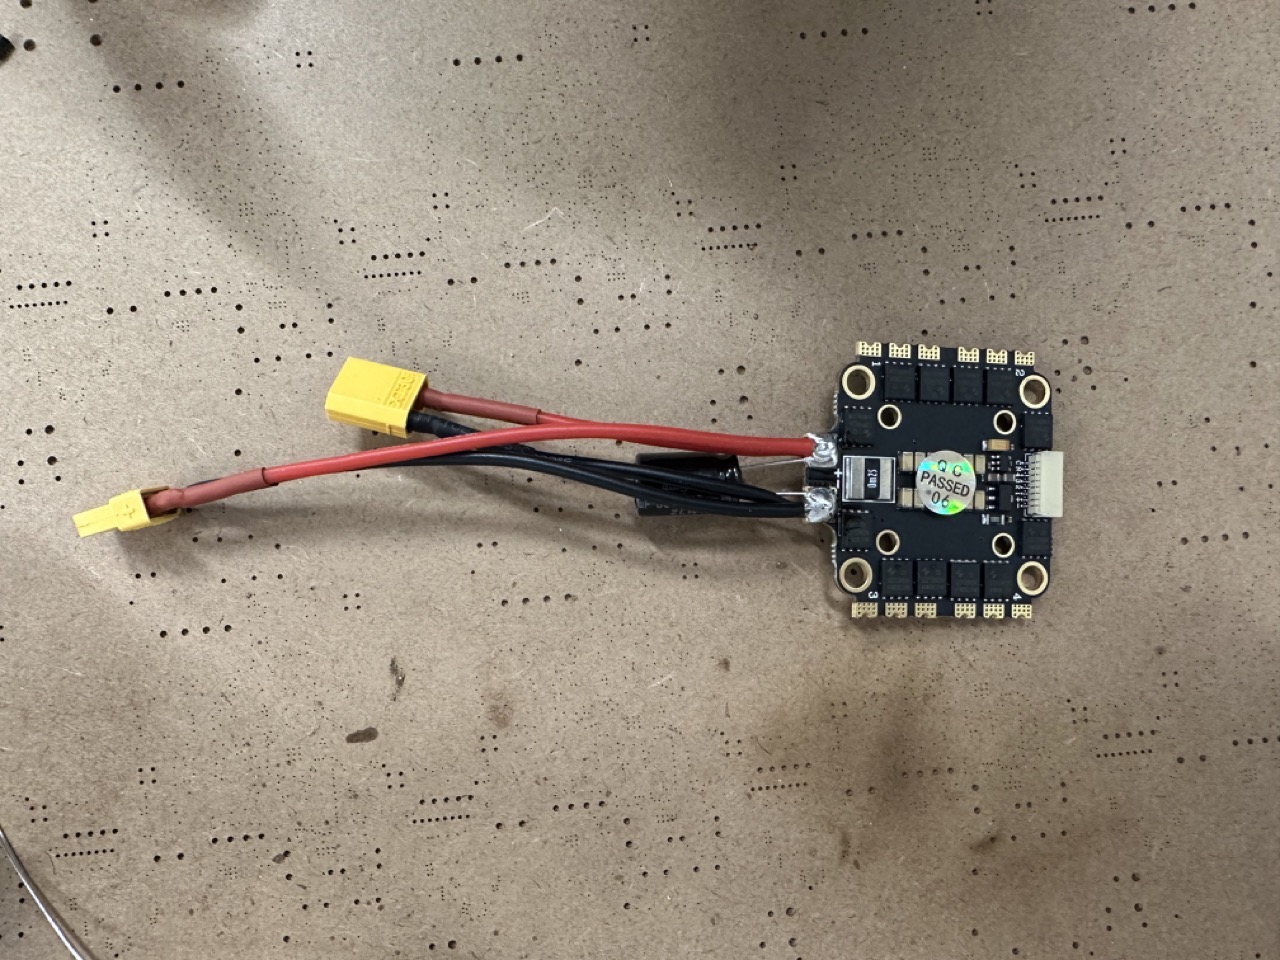
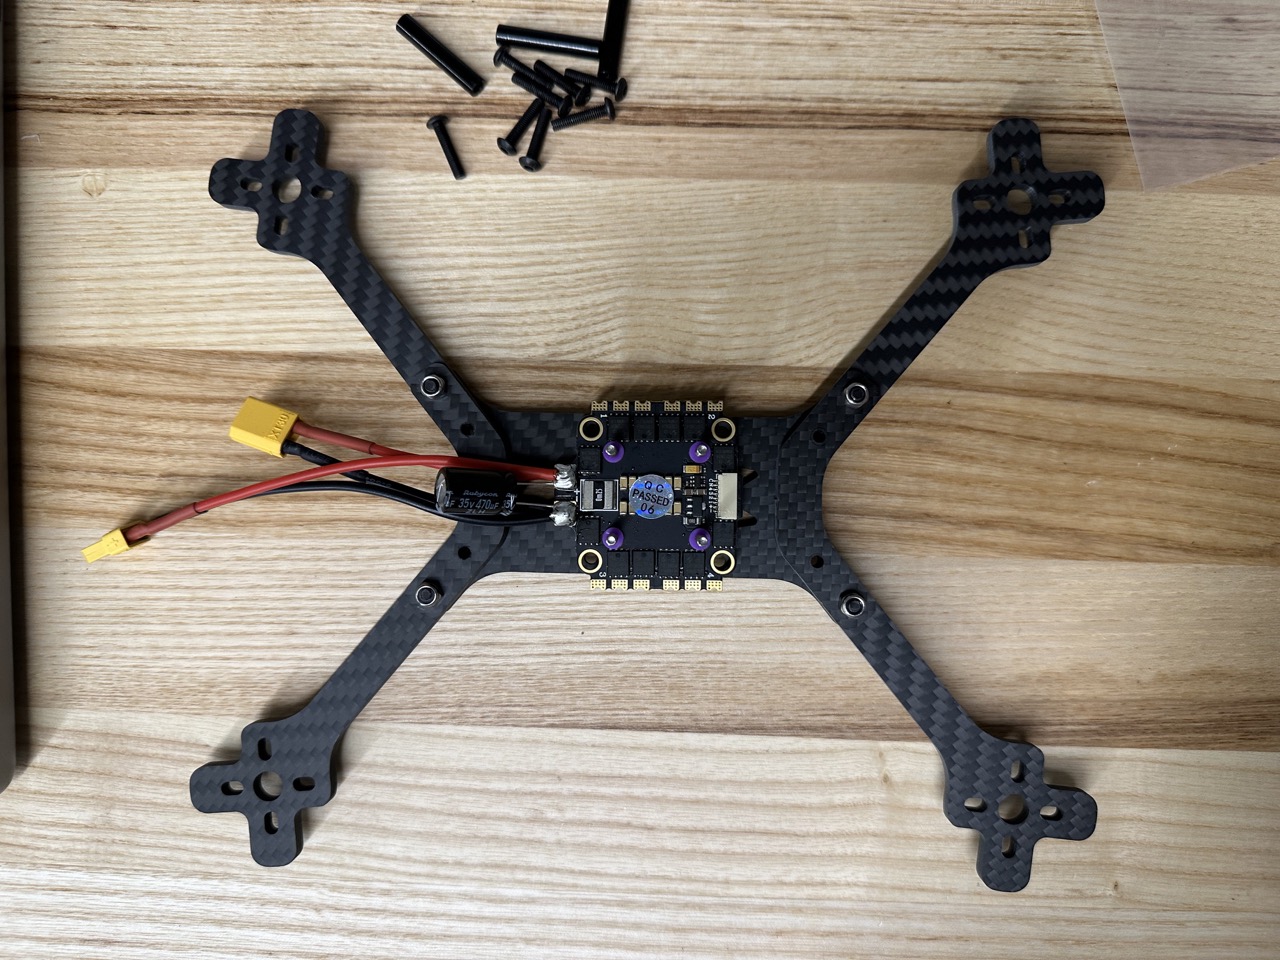
Solder the power cable.
Install the ESC into the frame with M2.5*20 screw. Pay attention to the front and back of the ESC.
Install arms.
Install motors.
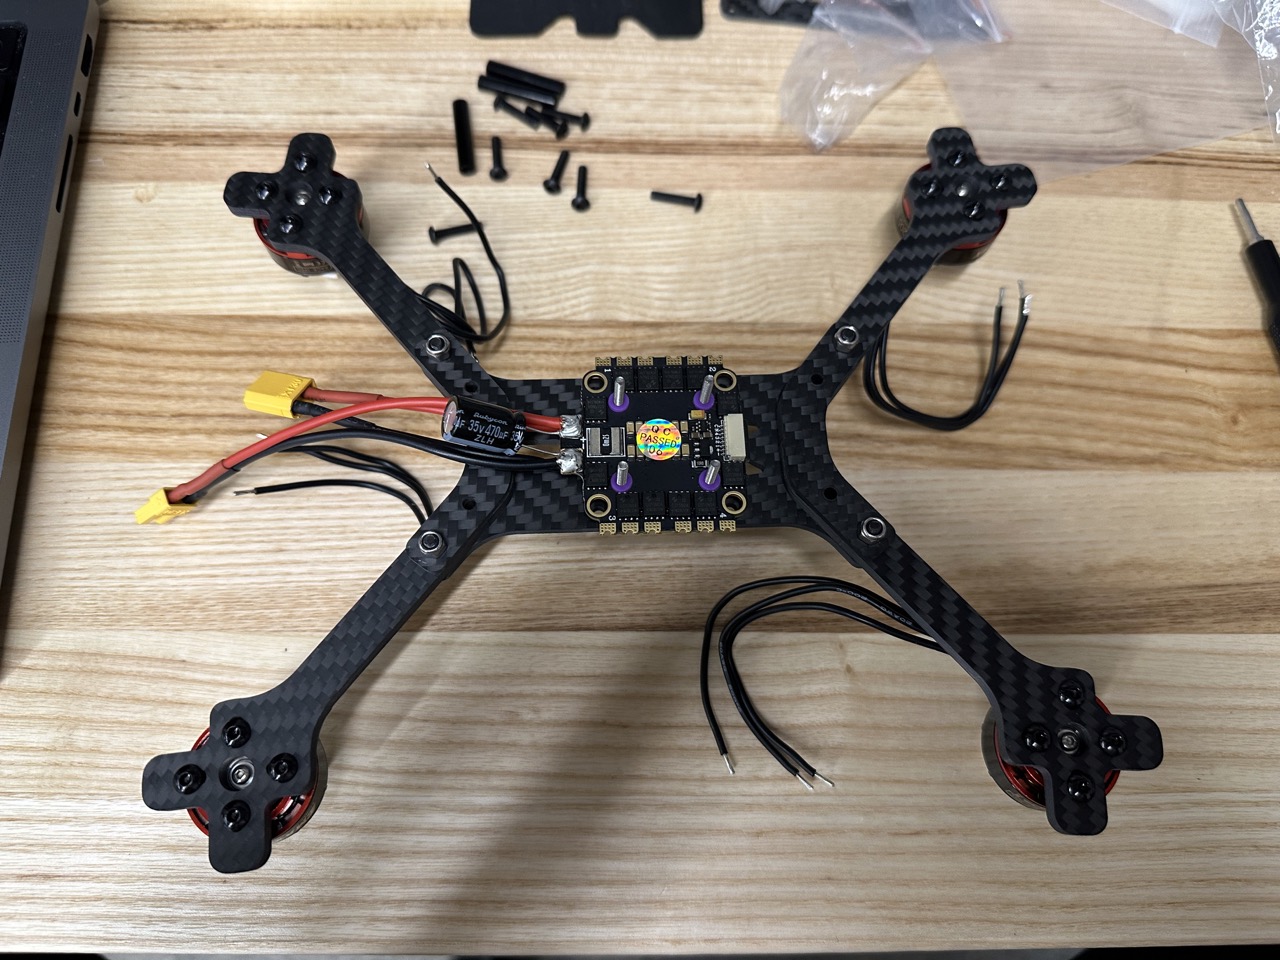
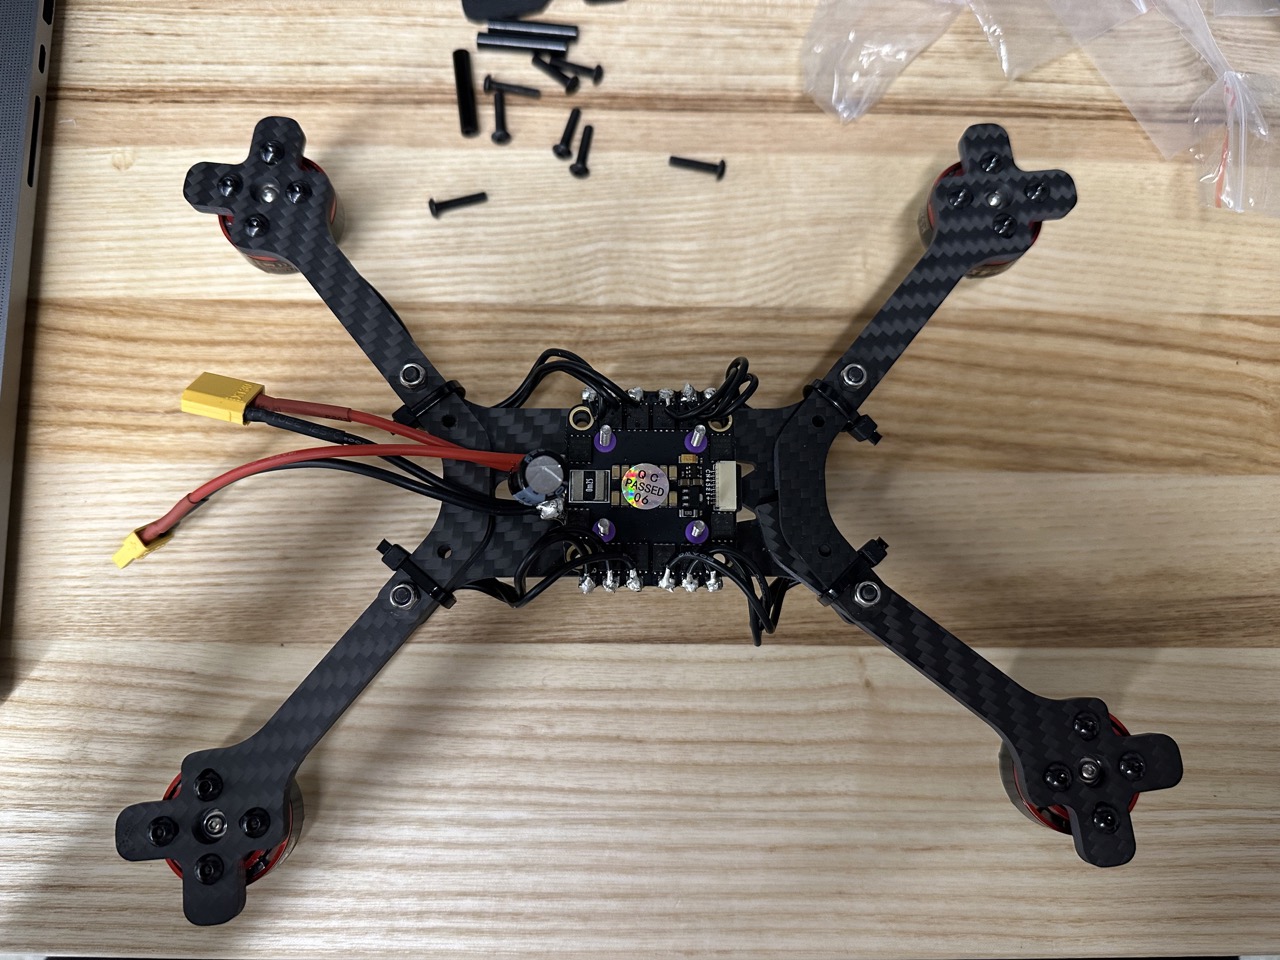
Solder motor wire to ESC.
Pix32 Preparation
Before assembly: Upload custom firmware to Pix32. Calibrate the Acc, Gyro and compass.
Insert the nut into the Pix32 stands. Set iron to 200 degrees 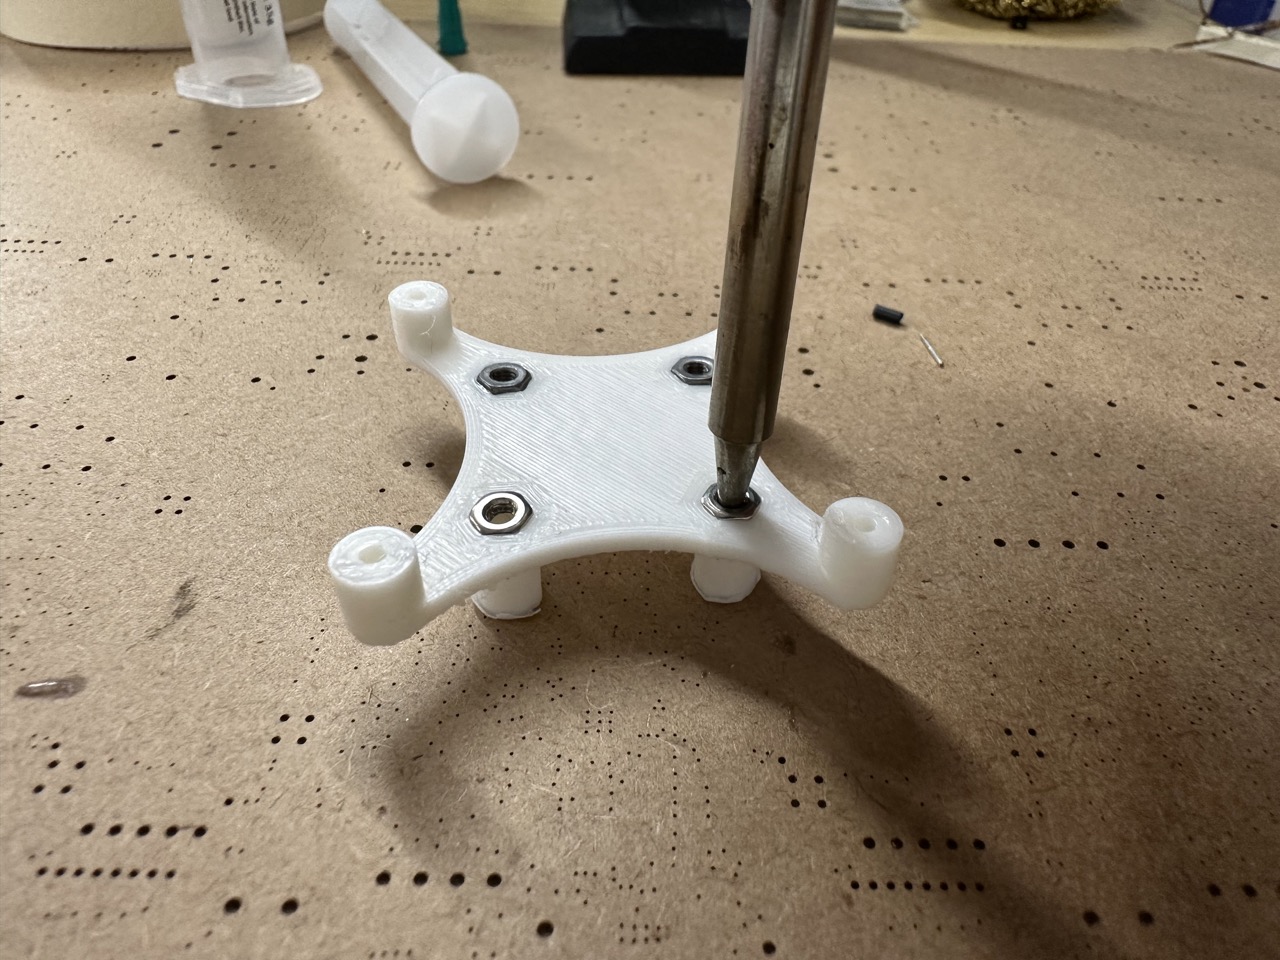
Prepare the following items: 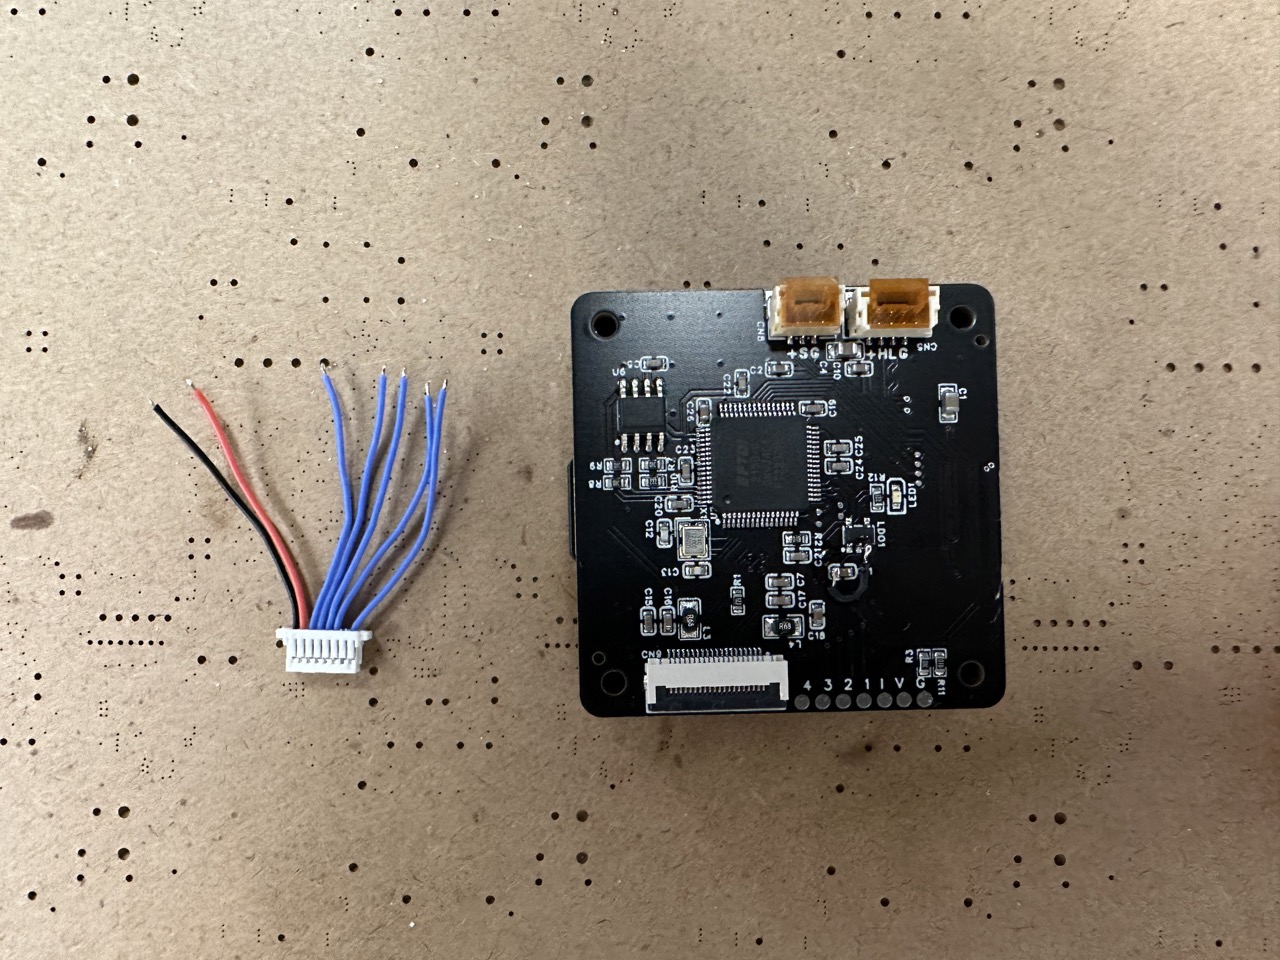
Due different motor ordering with 4 in 1 ESC and PX4, we need to remap the channel. 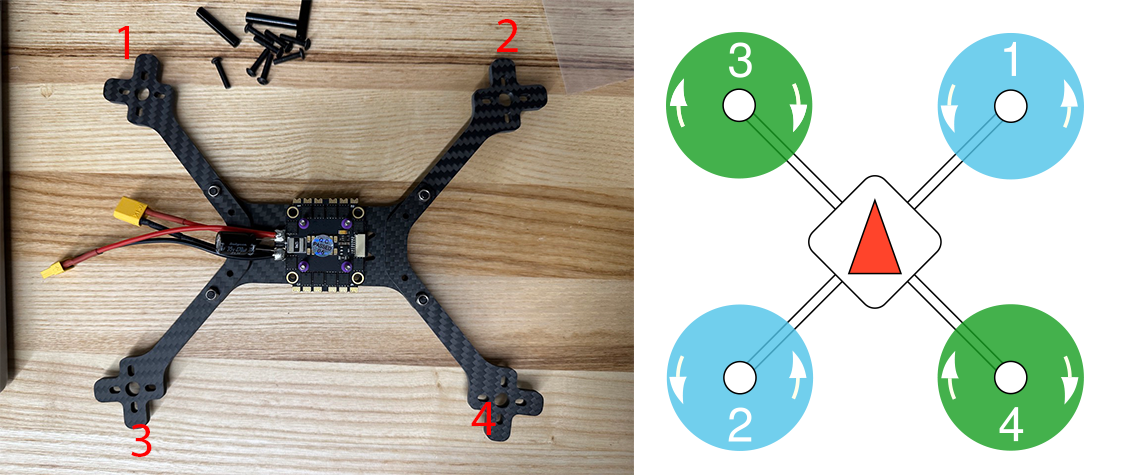
ESC wiring table:
| ESC | Pix32 |
| CUR | I |
| NC | NC |
| 4 | 4 |
| 3 | 2 |
| 2 | 1 |
| 1 | 3 |
| + | V |
| - | G |
Solder it: Do not reference to the image, use the wiring table 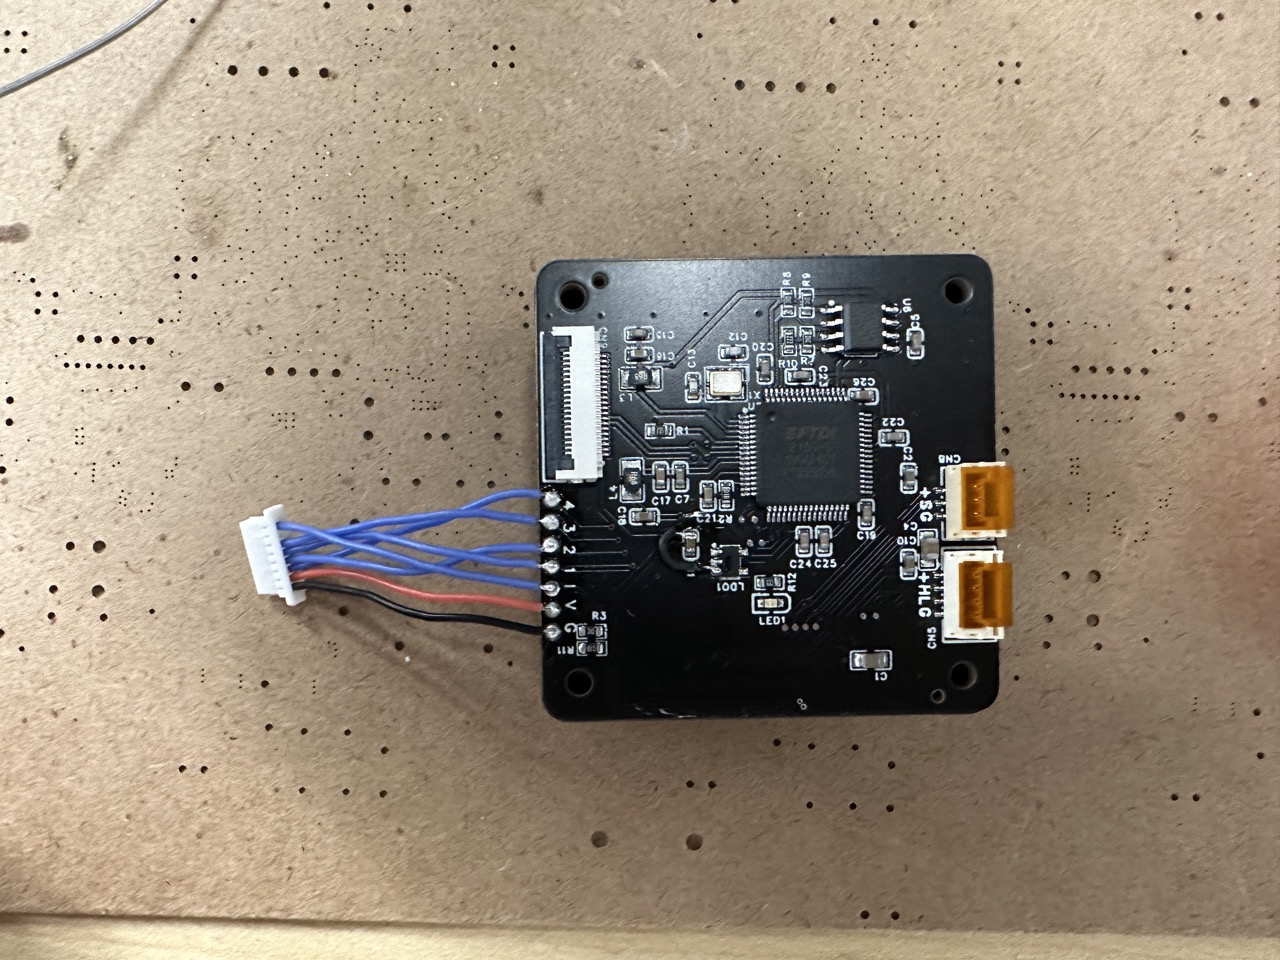
Install the pix32 support with M2*12: 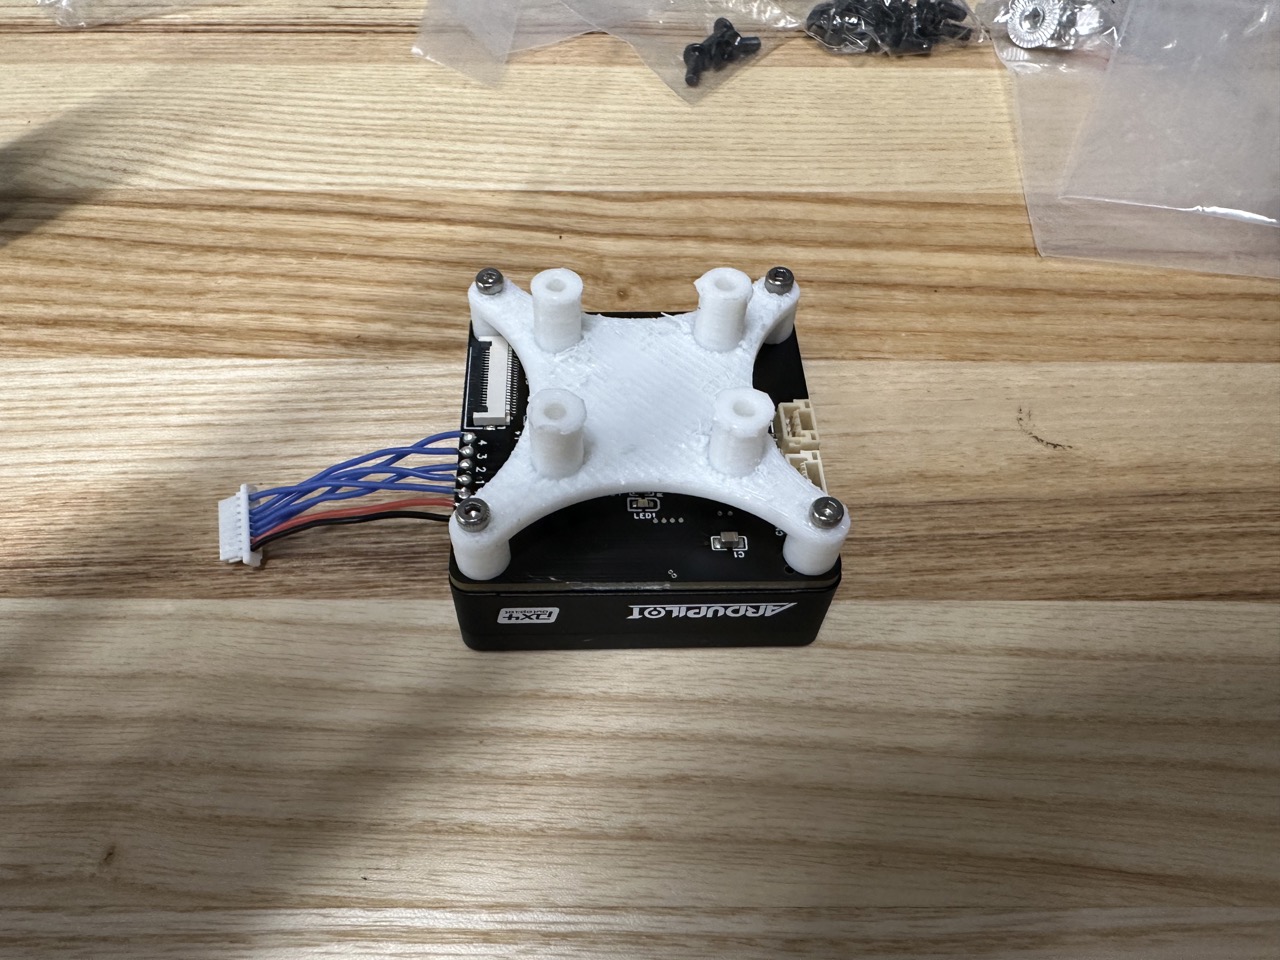
Connect the cable: 
Install into the frame: 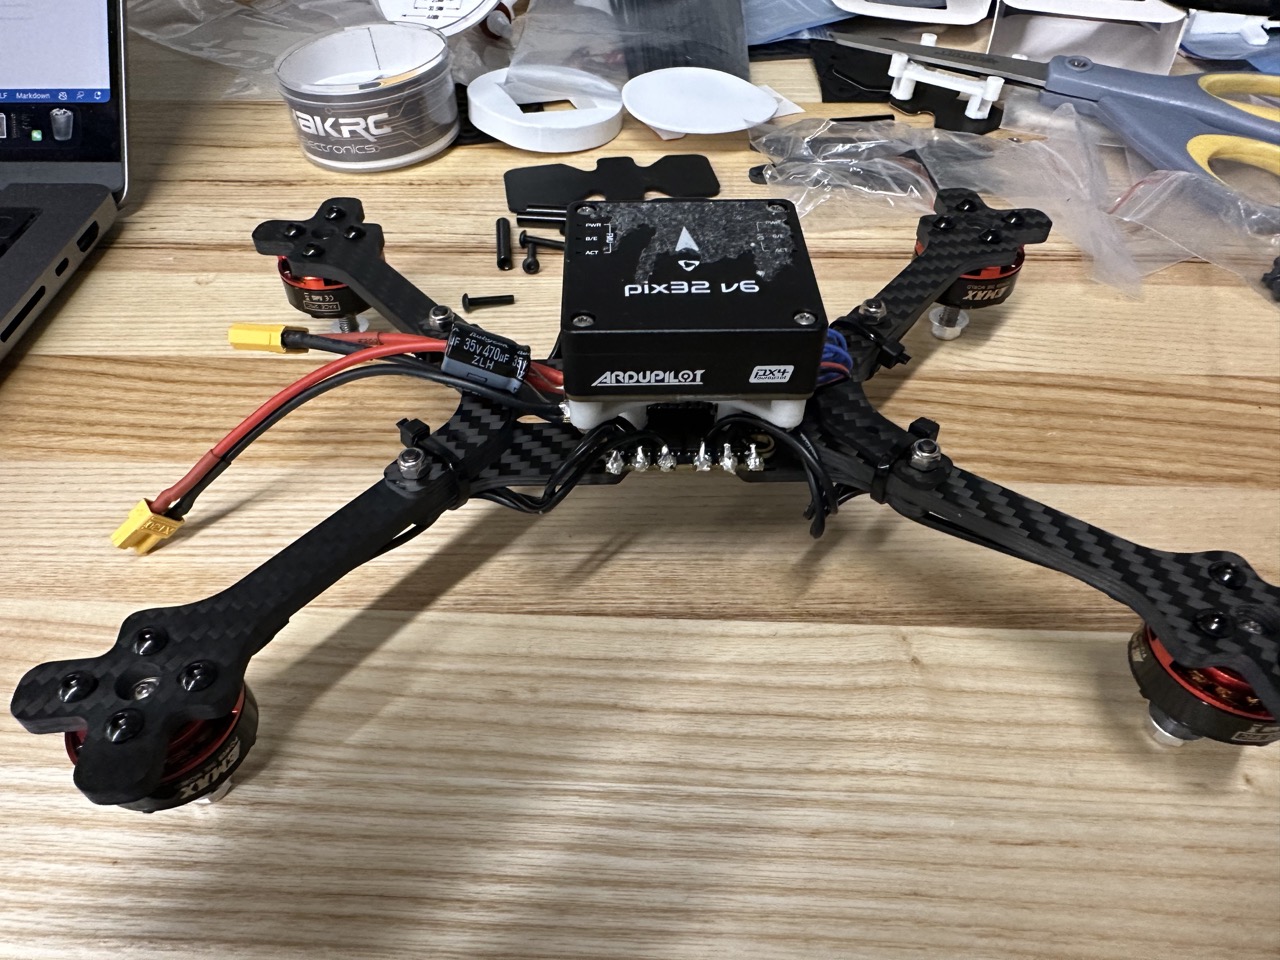
Battery stands and Xavier Assembly
Install the battery stands, replace bottom M3 strew with M3*16: 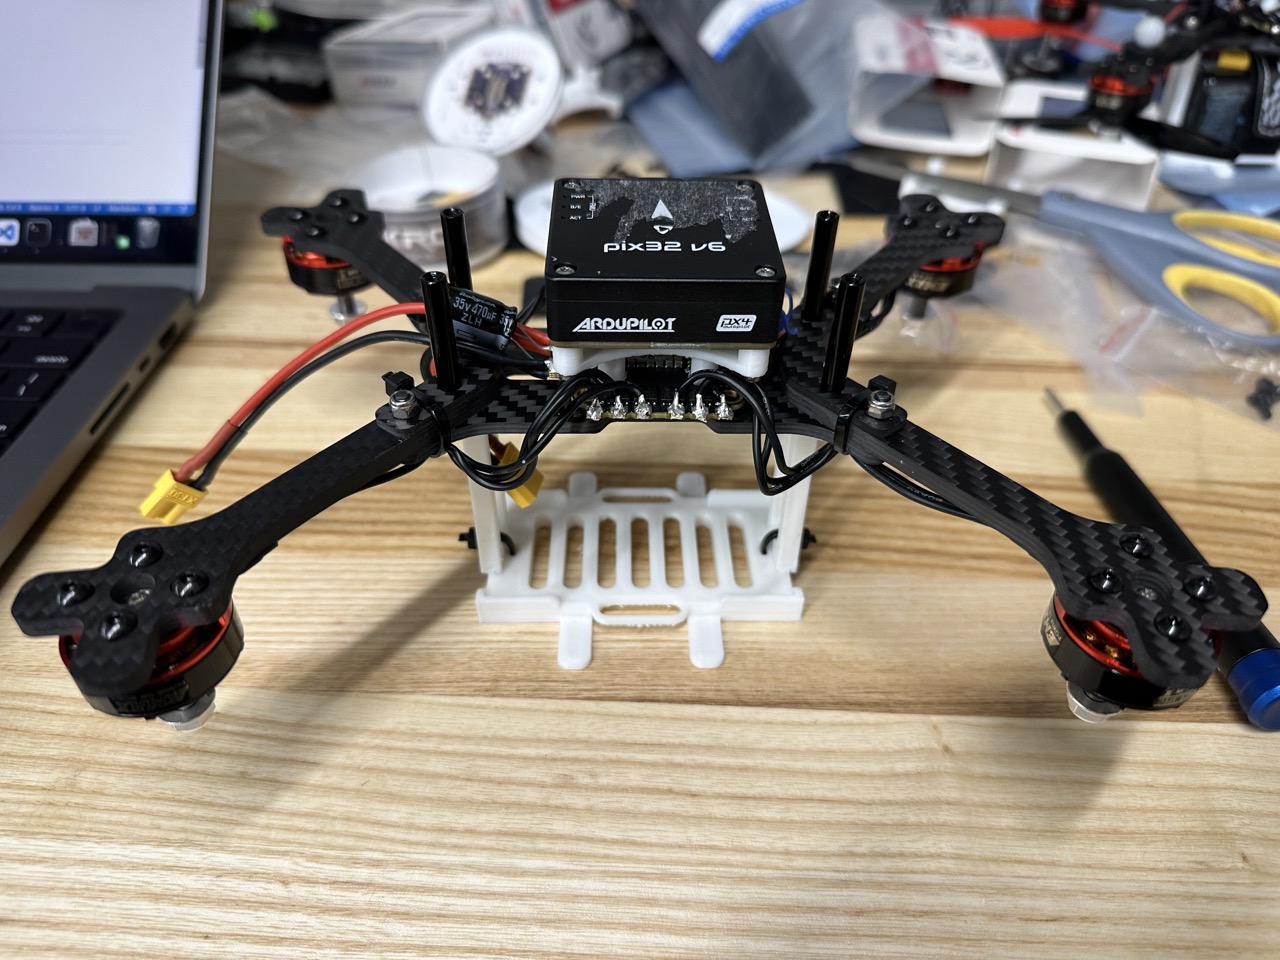
Install Xavier support: 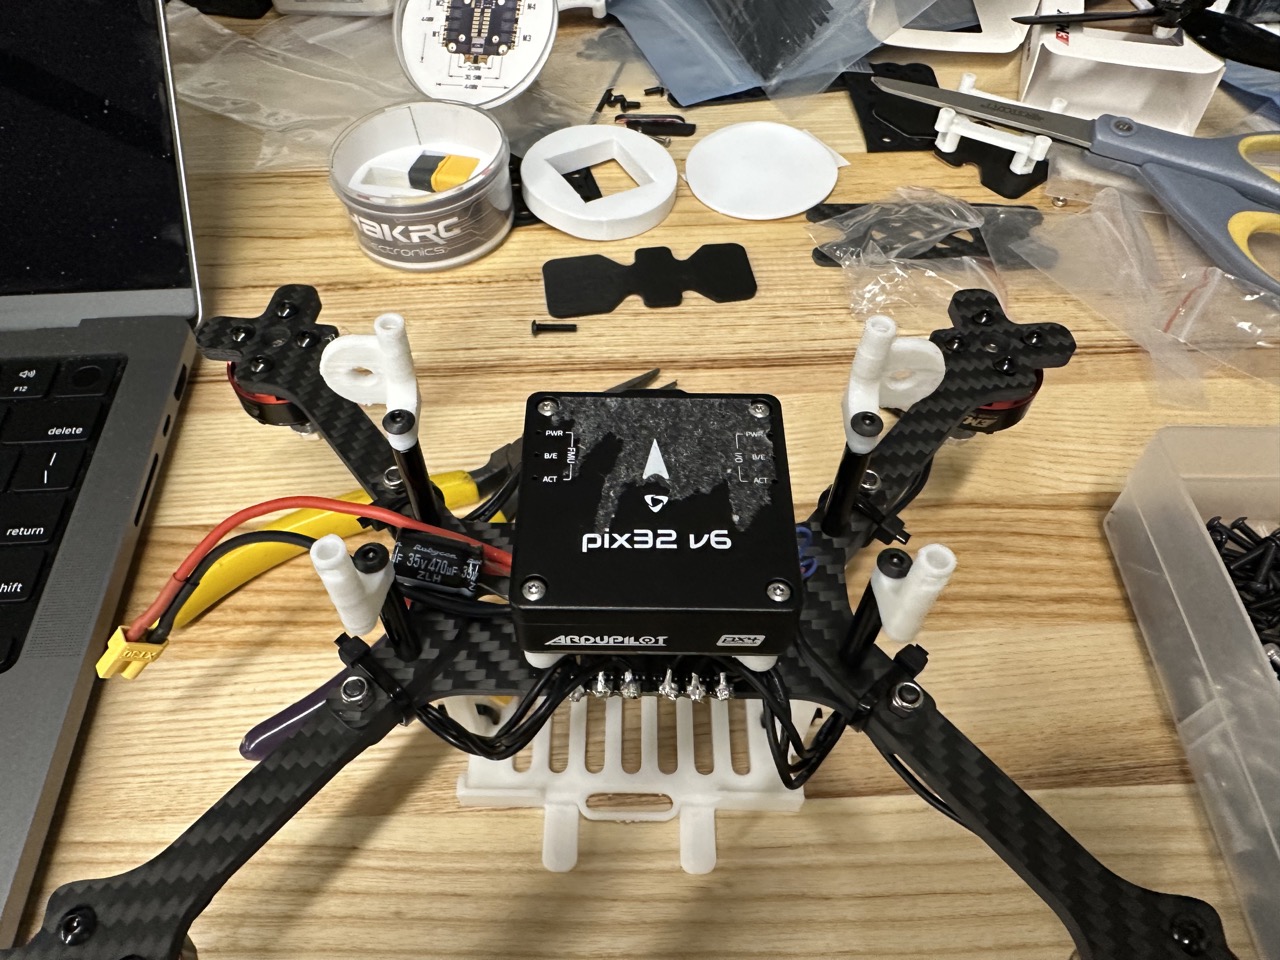
Install Xavier: 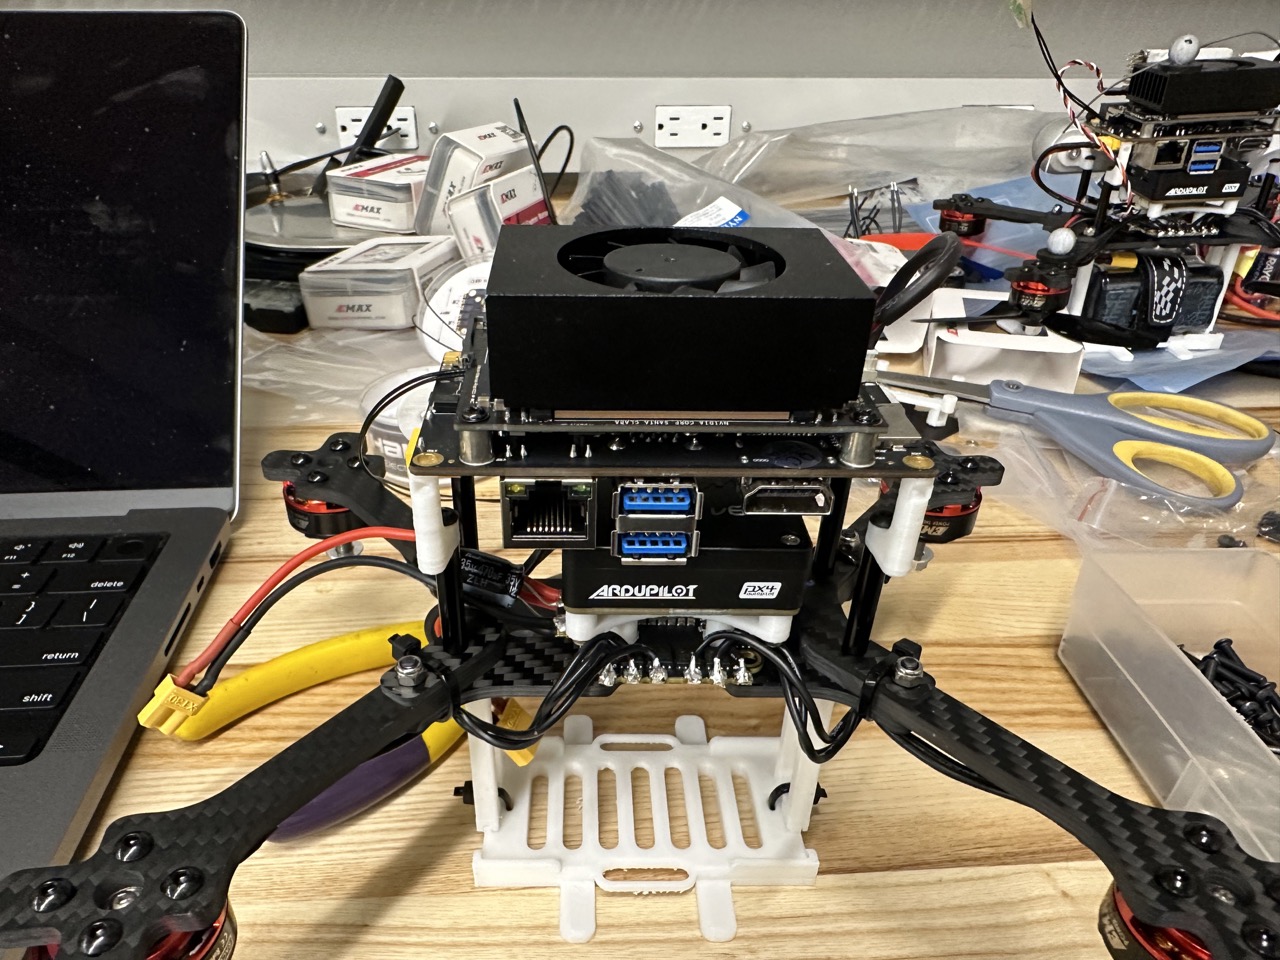
Install WiFi module: 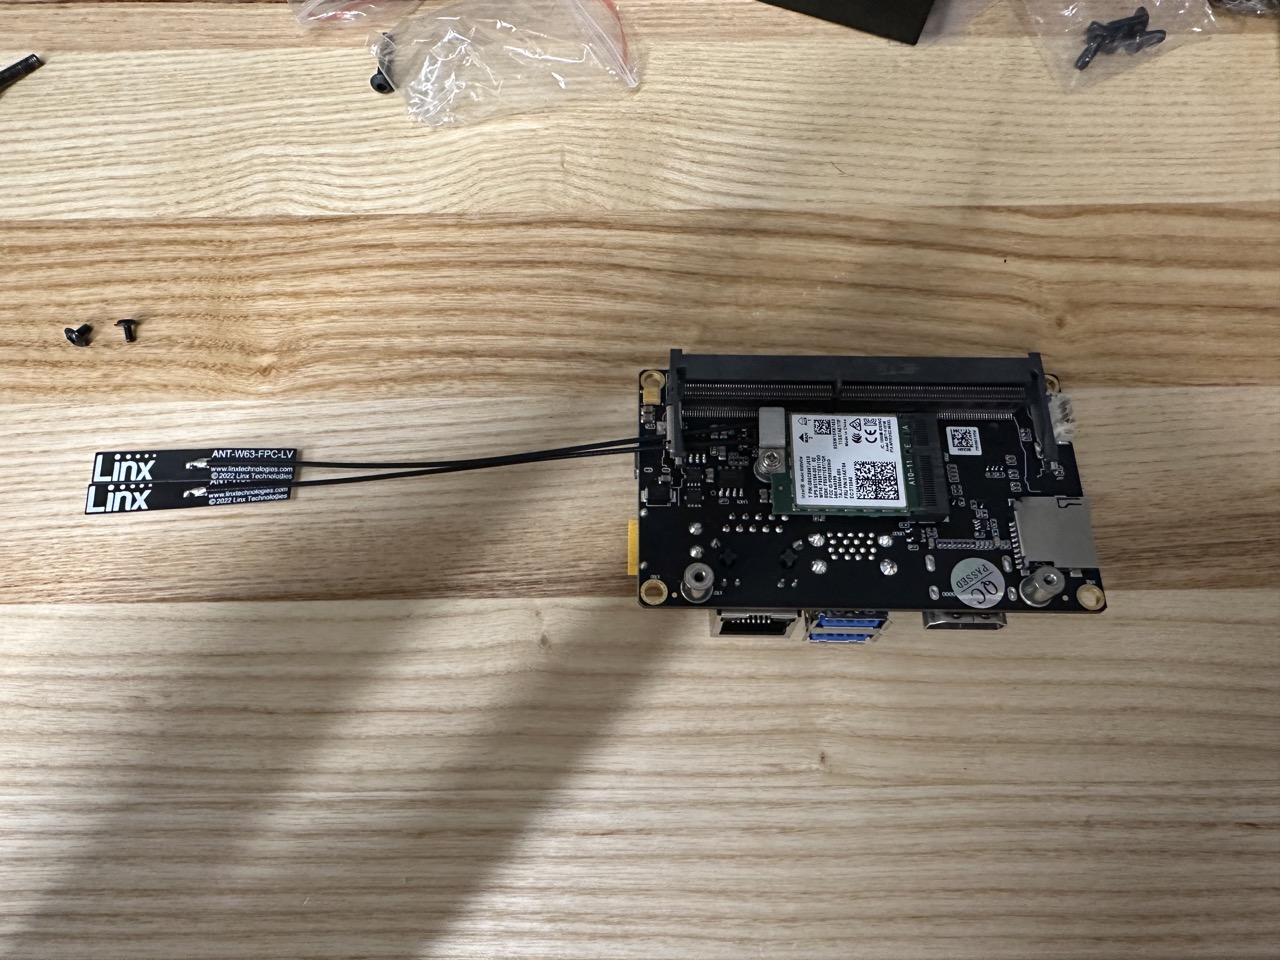
Install Xavier module: 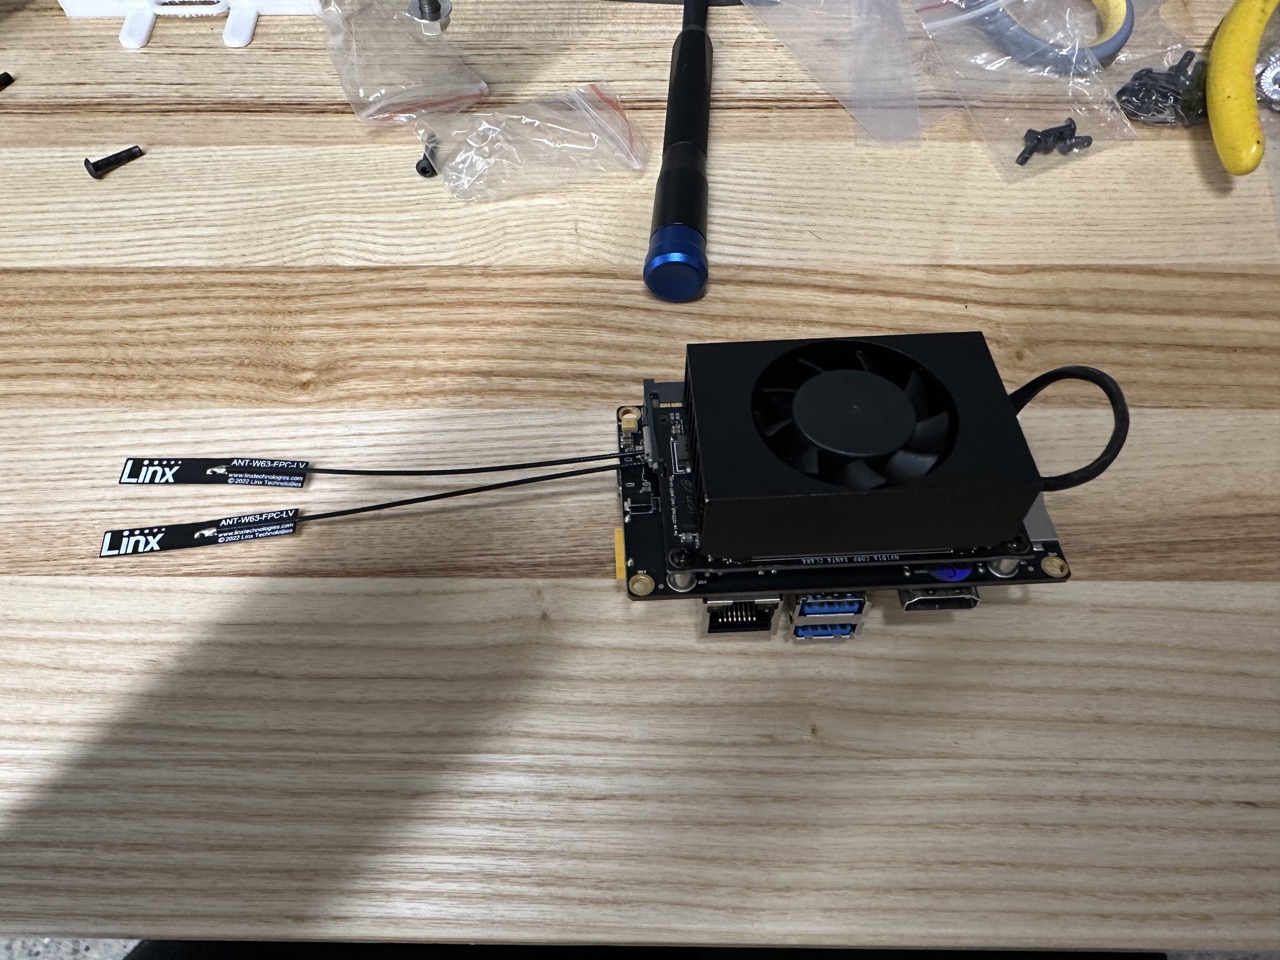
- The steps are same for assembling Jetson Orin instead of Xavier. Just use the
A603carrier board instead of the carrier boardA203used for Xavier.
PX4 Configuration Guide
- For the purpose of checking the motors and calibrating the sensors, flash the default PX4 firmware using QGC on the Pix32 V6.
Setup Dshot and test motors
- Make sure the propellers are removed for this setup and throughout testing the motors.
- set
SYS_USE_IOtoIO_PWM_DISABLE - set
DSHOT_CONFIGtoDShot600 - Verify motor order using Mavlink console
dshot beep1 -m [Motor number] - Verify motor spinning direction
- Use the following command to reverse motor
dshot reverse -m [Motor number],dshot save -m [Motor number] - Motors can be checked individually inside the /Vehicle Setup/Motors tab inside the QGC.
Flashing the custom PX4-Autopilot-Quad
- First clone the PX4-Autopilot-Quad
- Run the following commands to make sure that px4 build will recognize the tags:
$ git clone git@github.com:dev10110/PX4-Autopilot-Quad.git $ cd /PX4-Autopilot-Quad $ git submodule update --init --recursive $ git remote add upstream https://github.com/PX4/PX4-Autopilot.git $ git fetch upstream --tags - Then build and run the docker using the following commands.
$ docker compose build $ docker compose up -d $ docker exec -it <container-name> bash - Make the px4 version using the following command inside the docker in /home/px4
$ make px4_fmu-v6c_dasc - Flash the
px4_fmu-v6c_dascusing the QGC.
PX4 Parameter (old version 1.13)
- Set
MAV_SYS_IDto be a different value from other Drone (match number with name of drone) - Set
HoldandOffboardforCOM_RCL_EXCEPT - in
EKF2_AID_MASK: CheckGPS,vision position fusion, andvision yaw fusionif outdoor, and onlyvision position fusionandvision yaw fusionif indoor- NOTE: Code for vision position fusion is different whether or note use GPS is checked
- Set
EKF2_HGT_MODEto GPS if doing outdoor testing and Vision if doing indoor testing - Set
EKF2_GPS_P_NOISEto 0.2 m - Set
EKF2_GPS_V_NOISEto 0.15 m/s - set
MAV_0_RATEto 0 B/s (i.e. unlimited data sending rate) - set
COM_RC_IN_MODEset to joystick only - set
MAV_0_RADIO_CTLto disable - set
SER_TEL1_BAUDto 115200 8N1 - set
RTPS_CONFIGto TELEM 2 - set
SER_TEL2_BAUDto 921600 (might need to reboot vehicle to see this option)
PX4 Parameter (new v1.14)
- Set
MAV_SYS_IDto be a different value from other Drone (match number with name of drone). This number matches the number in the namepx4_#. The current custom firmware PX4-Autopilot-Quad requires the robot name to be in the formatpx4_#. Here#is theMAV_SYS_ID. - Set
HoldandOffboardforCOM_RCL_EXCEPT - Set
EKF2_EV_CTRLto 15 (check all boxes) - Set ‘EKF2_EVP_NOISE’ and ‘EKF2_EVA_NOISE’ to lowest possible values
- Set
EKF2_HGT_MODEto GPS if doing outdoor testing and Vision if doing indoor testing - Set
EKF2_GPS_P_NOISEto 0.2 m - Set
EKF2_GPS_V_NOISEto 0.15 m/s - set
MAV_0_CONFIGtoTELEM1so that mavlink communicates using TELEM1. - set
MAV_0_RATEto 0 B/s (i.e. unlimited data sending rate) - set
COM_RC_IN_MODEset to joystick only - set
MAV_0_RADIO_CTLto disable - set
SER_TEL1_BAUDto 115200 8N1 - set
XRCE_DDS_CONFIGto TELEM2 (reboot after this) - set
XRCE_DDS_DOM_IDto theROS_DOMAIN_IDyou are using. - set
SER_TEL2_BAUDto 921600 (might need to reboot vehicle to see this option) - set
EKF2_MAG_TYPEto None (disables mag, requires reboot) - make sure
MAV_1_CONFIG,MAV_2_CONFIGetc are false, or atleast not usingTELEM2(which we have dedicated to the XRCE connection).
QuadControl Parameters(Updated 06/19/2024)
- Set
QUAD_ESC_NONLINto 0.525 - Set
QUAD_IXXto 0.002 kgm^2 - Set
QUAD_IYYto 0.002 kgm^2 - Set
QUAD_IZZto 0.003 kgm^2 - Set
QUAD_KOMEGAto 0.120 kOmega - Set
QUAD_KRt o 0.900 kR - Set
QUAD_KTHRUSTto 1.370 (N / (kilo-rad/s)^2) - Set
QUAD_KTORQUEto 0.190 (Nm / (kilo-rad/s)^2) - Set
QUAD_KVto 4.0 kv - Set
QUAD_KXto 7.0 kx - Set
QUAD_OMEGA_MAXto 2.520 krad/s - Set
QUAD_Mto- 0.680 kg if not using realsense
- 0.870 kg if using realsense D455
- Update this based on the mass of your quadrotor
- Set all the motor positions
- if not using Realsense (i.e., the CG is pretty much at the exact center location)
QUAD_ROT1_POSX: 0.070QUAD_ROT1_POSY: 0.085QUAD_ROT2_POSX: -0.070QUAD_ROT2_POSY: -0.085QUAD_ROT3_POSX: 0.070QUAD_ROT3_POSY: -0.085QUAD_ROT4_POSX: -0.070QUAD_ROT4_POSY: 0.085
- if using Realsense D455: (shifts the CG in the +x direction by 6.1 mm)
QUAD_ROT1_POSX: 0.064QUAD_ROT1_POSY: 0.085QUAD_ROT2_POSX: -0.076QUAD_ROT2_POSY: -0.085QUAD_ROT3_POSX: 0.064QUAD_ROT3_POSY: -0.085QUAD_ROT4_POSX: -0.076QUAD_ROT4_POSY: 0.085
- if not using Realsense (i.e., the CG is pretty much at the exact center location)
Setting up Orin or Xavier
-
First, use the SDK manager to flash the Orin
-
Connect the Orin with the carrier board to the host computer using the USB A-to-micro cable. Also, power the Orin carrier board using the power supply instead of the battery.
- At this point, you might encounter the following scenarios:
- The SDK manager successfully detects the board. In this case, proceed to next step.
- The SDK manager does not detect the board. In this case, you need to force the Orin into recovery mode. For the Orin carrier board A603, recovery mode can be initiated by shorting 3 and 4 in W7. Please refer to the picture and this document for more details: A603 Documentation. If using Xavier with the carrier board A203, recovery mode can be initiated by shorting 6 and GND (1,2,3,4). A203 Documentation
[TODO: Add picture]
-
In the target components, select Jetson Linux only. You don’t need to select Jetson Runtime Components as we will mostly be working inside the Docker container. Accept the terms and continue.
- In the SETUP PROCESS:
- Choose Automatic Setup in the
Recovery mode setup. - Keep the default IP address.
- If this is the first time, then enter
username: ubuntuandpassword: hello123. We keep this consistent across all modules. - If this is not the first time the Orin is being flashed, then enter the current username and password, and make sure the new username and password match the details given above. You can provide a new username and password by unchecking the
Use current username/passwordbox. - Select the
Storage Deviceas NVMe. This is becasue we are flashing on the SSD.
- Choose Automatic Setup in the
-
The flash can fail due to a bad Orin, carrier board, or SSD. Make sure to check each component.
- After booting up the Orin, change the hostname permanently to
orin#such thatusername@hostname = ubuntu@orin#. The number#should be selected after checking all numbers on the active orin modules. Follow these commands to change the hostname permanently:$ hostname $ sudo hostnamectl set-hostname NEW_HOSTNAME -
Reboot and check if the hostanme has been set successfully.
- In order to SSH into the orin remotely, set the first line of
/etc/hoststo127.0.0.1 $HOSTNAME - To SSH into the Orin remotely, use following commands:
$ ssh ubuntu@orin#.local $ password: hello123 - Then run the flash.sh inside the Orin once it is ready. The flash file can be found here. Consider removing
sudo apt-get upgradeas it has previously deleted Kernel. The flash file can be executed using following commands$ chmod +x path/to/flash.sh $ ./flash.sh - Generate a new SSH key for github (Link). Or follow these commands and then copy the key from the last command to the github account
git config --global user.email "your_email.com" git config --global user.name "username" ssh-keygen -t ed25519 -C "your_email.com" eval "$(ssh-agent -s)" cat ~/.ssh/id_ed25519.pub - Clone the px4-jumpstart repository and build the docker file.
$ git clone https://github.com/dasc-lab/rover_px4_ros2_jumpstart.git
$ cd rover_px4_ros2_jumpstart
$ docker compose build
- The docker-compose.yaml can be changed accordingly if required. At a minimum, it should contain the following:
version: "3"
services:
  ros:
    build: .
    privileged: true
    tty: true
    network_mode: "host"
    volumes:
       - ./colcon_ws:/home/colcon_ws
       - /tmp/.X11-unix:/tmp/.X11-unix
       - $HOME/.Xauthority:/home/admin/.Xauthority:rw
    environment:
      - DISPLAY=$DISPLAY
      - FASTRTPS_DEFAULT_PROFILES_FILE=/home/colcon_ws/rtps_udp_profile.xml
      - ROS_DOMAIN_ID=4
- Configure some ROS2 settings: Tuning the DDS settings at a system kernel level can help avoid missed messages. See https://docs.ros.org/en/humble/How-To-Guides/DDS-tuning.html for more details. The main thing to do is to create/append to the file
/etc/sysctl.d/local.confwith the following lines:net.ipv4.ipfrag_time=3 # 3s (default = 30s) net.ipv4.ipfrag_high_thresh=134217728 # 128MB (default = 4MB)By changing this file (instead of using the cli to set the parameter) the parameters persist between reboots. These settings should also be available in the docker container.
- For Orin Only: The Seeed Studio A603 carrier board for the NVIDIA Orin NX has an issue with the kernel drivers for usbserial. Essentially, instead of using the usbserial.ko for the board which are modified by Seeed, the default usbserial.ko is used. This causes the FTDI driver to not work as expected. The solution is to move the usbserial.ko file which causes the new file from Seeed Studio to be used.
$ cd /lib/modules/5.10.120-tegra/kernel/drivers/usb/serial/
$ sudo mv usbserial.ko usbserial.ko.bk
-
Use
dmesg | grep ttyto check if the tty/UAB0 and tty/USB1 are successfully detected. -
Configure the
colcon_ws/src/all_launch/config/mavlink-router.conf file. TheAddressshould match the ip address of your computer running the QGC. The ip address can be checked by runningifconfig
[UartEndpoint alpha]
Device = /dev/ttyUSB0
Baud = 115200

[UdpEndpoint alpha]
Mode = Normal
Address = <host_computer_ip>
Port = 14550
-
Configure the
/colcon_ws/src/all_launch/launch/px4.launch.pysuch that the microXRCE_bridge uses/dev/ttyUSB1and therobot_name = "px4_#, where the#matches theMAV_SYS_IDin the QGC parameters. -
Once the files are configuresd, build the rover_px4_ros2_jumpstart
$ docker compose up -d
$ docker exec -it <Container-name> bash
$ cd /root/colcon_ws
$ colcon build --symlink-install --cmake-args -DCMAKE_BUILD_TYPE=Release
First flight
- Make sure that the drone is properly tethered.
- To avoid any crashes, start with a quarter of the original quadrotor mass, i.e.,
QUAD_M/4. This will provide less thrust than required for the drone to lift. Slowly increase the mass to the correct value once the motors are confirmed to be working fine. - Consider using the px4 Flight Review to debug.
On Orin
Run the docker and launch the px4.launch.py
$ docker compose up -d
$ docker exec -it <Container-name> bash
$ ros2 launch all_launch px4.launch.py
On ground station
Run the docker and launch the gs.launch.py
$ git clone git@github.com:dasc-lab/rover_groundstation_ros2_jumpstart.git
$ cd rover_groundstation_ros2_jumpstart
$ docker compose build
$ docker compose up -d
$ docker exec -it <Container-name> bash
$ ros2 launch ground_station_launch gs.launch.py